


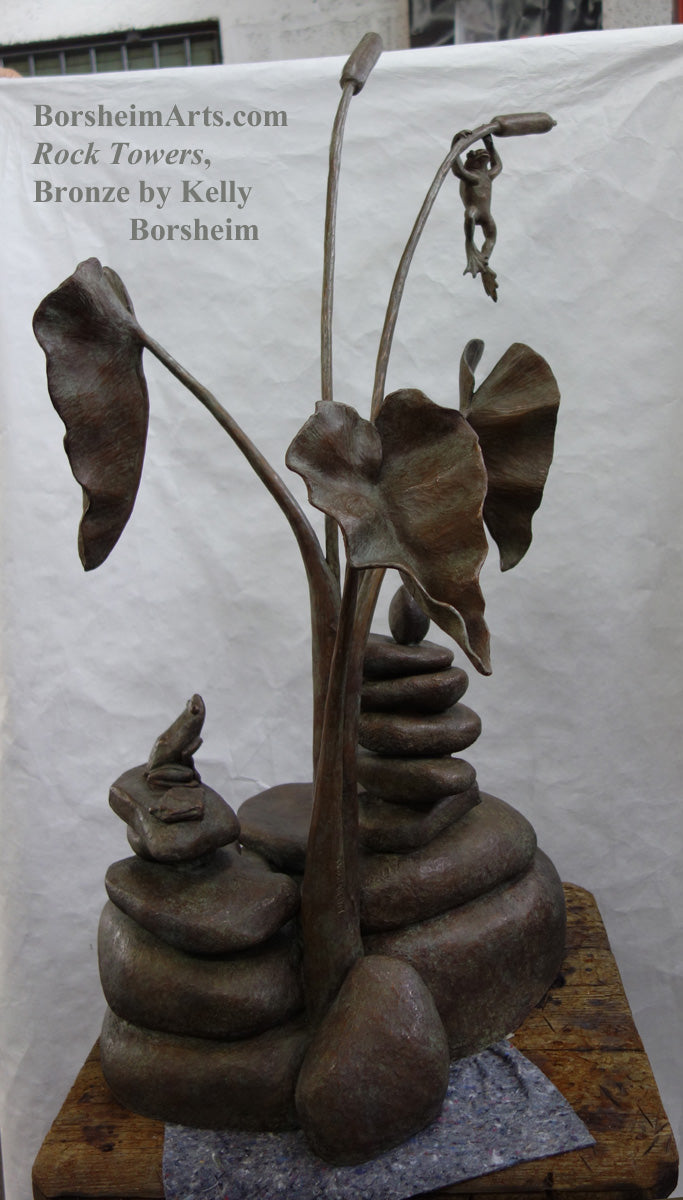


- Bronze Aquatic Garden Sculpture
- 40 x 30 x 25 inches
- Available by ORDER only; see description below
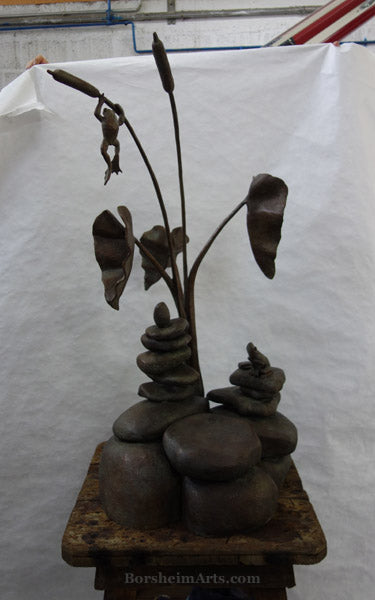
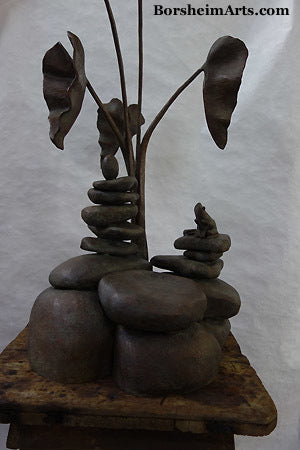
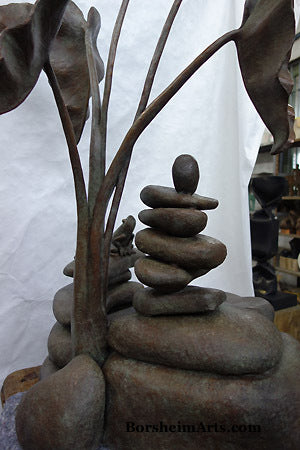
Rock Towers and Frogs
bronze sculpture, limited edition
approx. 43" h x 24" w x 24" d [110 x 60 x 60 cm]
© 2016 Kelly Borsheim
ORDERS ONLY!
Order your original bronze, one-third non-refundable* deposit down starts the foundry process. The second payment is due after the wax sculpture is approved. The third and final payment is due once the bronze is finished, prior to shipping.
If you prefer smaller payments, you may choose the amounts and how often as is convenient to you. However, full payment must be made before the sculpture is shipped.
* The one-third non-refundable deposit/first payment may be applied instead to any other available Borsheim Artwork should you change your mind about this bronze.
NOTE: International Shipping will be quoted upon ordering. Any customs taxes are the responsibility of the buyer.
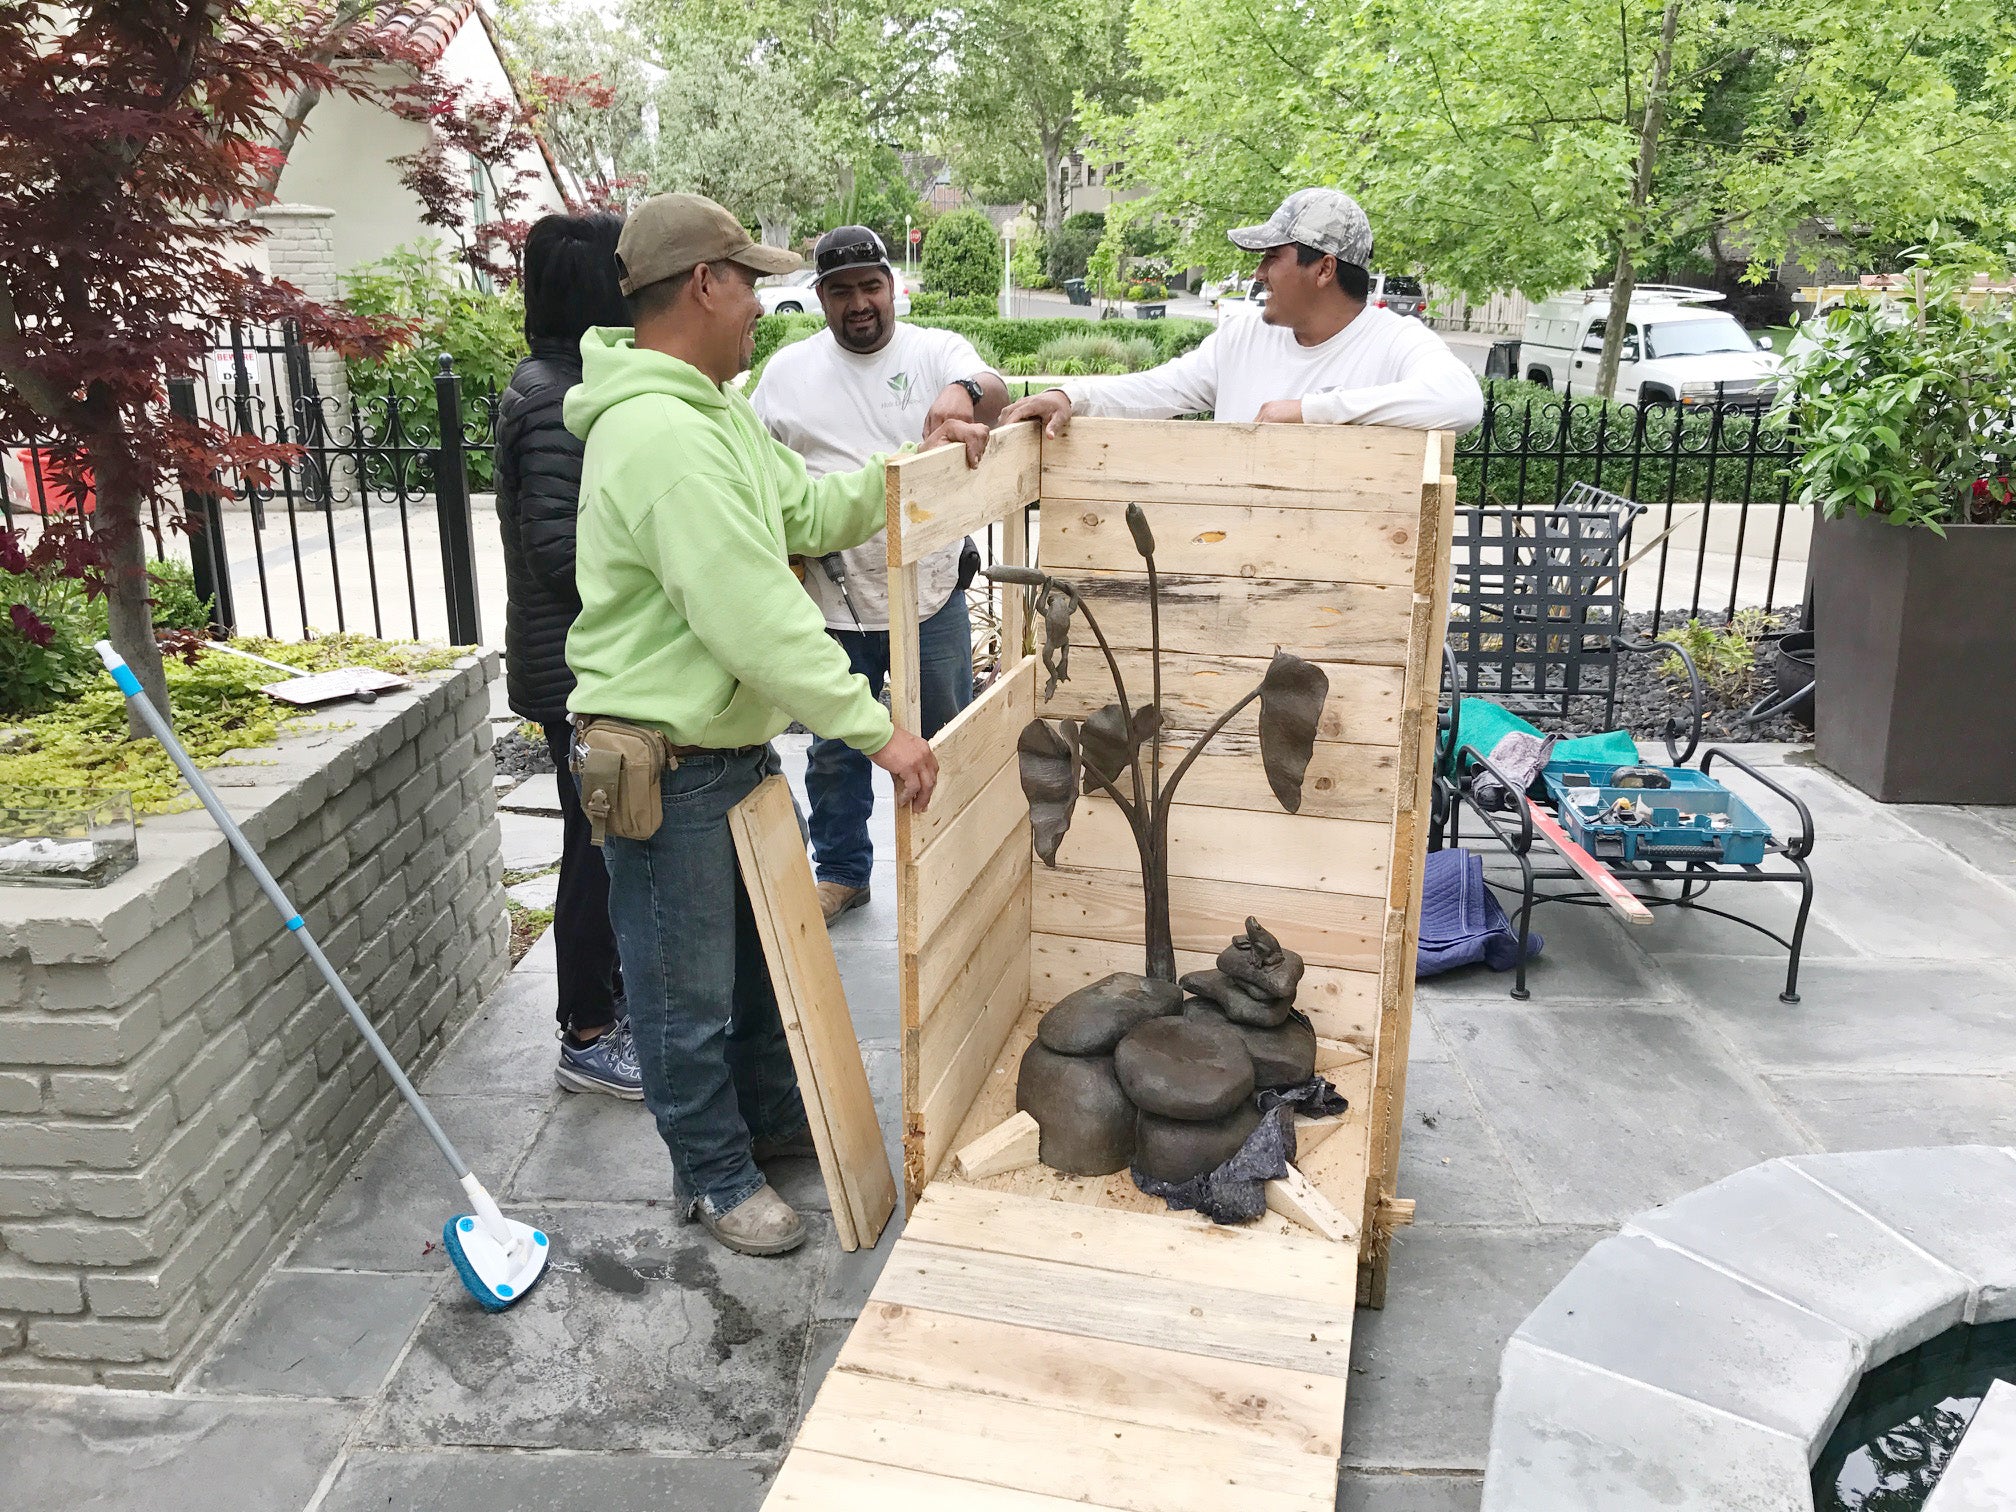
[Crated: approximately 135 x 80 x 80 cm; 131 kg]
This bronze is cast in Italy and shipped worldwide where you desire.
[Estimated casting time, 3-4 months; FYI: The first casting was shipped to California USA]
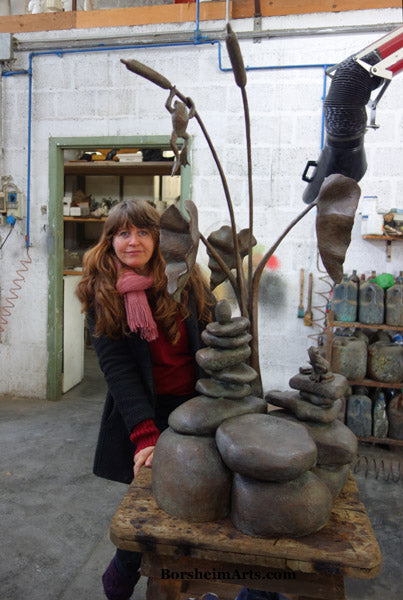
Rock Towers and Frogs Bronze Sculpture
4 December 2016: Here are some images of the finished bronze aquatic sculpture Rock Towers and Frogs. These were taken at the bronze foundry I used in Pietrasanta, Italy. I was limited to public transportation. I was not staying nearby and the foundry has shorter hours than was convenient with the train schedule. All this is to explain why I had too little time to set up a proper photo shoot. This first casting was crated and shipped directly to a private home in California shortly after these images were taken.
My landlord and I dropped off the original artwork in clay and mixed materials in July since I can no longer easily make my own molds. However, I returned to the foundry once they had made the molds and the hollow wax duplicates of my original composition. They separated each part to serve their method of casting (each foundry works in a slightly different way).
I cleaned up some of the wax parts to my satisfaction and proofed the others that had been done before I arrived. Also, we consulted with the metal department on how best to connect the smaller stones . . . in wax or in metal. I chose wax, but they chose metal. I deferred to their preferred method, trusting their professionalism.
My next visit to the foundry was during the metal chasing / clean-up work. I asked for a few changes and arranged the final composition of the stone towers and the frogs (all cast separately). I also poured water over the bronze to see what it would look like in the rain. Primarily I needed to see where the water pooled for birds, but also for the safety and care of the bronze. I marked for the metal workers the places where I wanted drainage holes drilled. They are small and hopefully not too noticeable. Standing water is not healthy for most things and we certainly do not want to create mosquito birthing pools!
Drainage hole for outdoor bronze sculpture (base of plant stalks):
I also ran my naked hands over the entire piece. We sanded down any part that felt "ouchy," which is a side-effect of pouring molten bronze at times. I do not want someone to get a nasty little surprise when touching the sculpture! There are perks in not being a rose. haha.
Because this bronze garden sculpture was designed to sit down inside of a pond with a surrounding ledge, it has a taller rock base in which some part of it will be below the horizontal wall of the pond. If I receive an image of the sculpture once in place, I will certainly share it with you here. Also, if you scroll down, you may see some of the images of the creation of this bronze composition. Then you will see how the original in foam, wax, and clay looked in comparison to the bronze.
More images can be seen below. Please contact me at my studio if this bronze [edition] sculpture would enhance your living space, your workplace, or even your community.
Thank you so much!
~ Kelly Borsheim
Above: my beloved bird's eye view of the bronze sculpture.
It Takes a Village . . . to Create a Bronze Sculpture
During conversations with the couple who contacted me because of an earlier tabletop sculpture Cattails and Frog Legs, I came up with two simple drawings that might satisfy the criteria for their circular-shaped pond. In the end, they preferred to keep the original cattails with suspended frog. We used the elephant ears to "fill up" a space, while keeping the airy feel of the original sculpture.
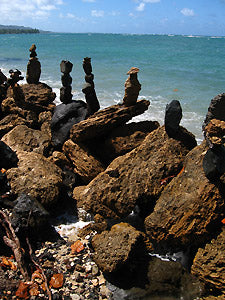
The first time that I saw towers of stone made only through balancing them was in Hawai'i. I find them fun, fascinating, and somehow comforting.
This all began in the hills of Tuscany. My neighbor Paul offered to help me rock hunt for models in his creek-bed. I was not entirely sure of what I was looking for, so we harvested more than I was likely to use. It was a good thing he has this little "tractor" for hauling a heavy load up from the ravine!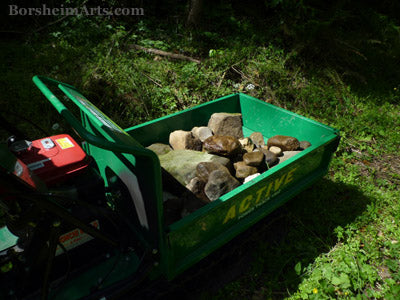
Naturally, a little play time was in order. When it comes to credibility in things such as balance, it really is better to work with models to gain some understanding of the dynamics of such things. No stones were harmed in the making of these rock towers.
I decided to create the frogs separately since the foundry I consulted with for my original Cattails and Frog Legs sculpture chose to cast the frogs separately from the plants and weld them in place after everything was bronze. So, I created a little wax "cookie cutter" in the rough shape of each frog, melted the sculpting wax, and did a pour. Once cooled, it was easier to start to refine the forms. I could have just cut wax to general sizes and weld them together, but really, I like to play with fire sometimes. There are often several just-as-good ways to do something, so choose the one that is the most fun for you.

Life in Italia is a bit different from vacationing here. Not only do I not (yet?) have a car, for the major part (since 2 Feb) of 2016, I have had a leg injury [which I now know will be resolved with surgery and a six-month rehab. situation in 2017]. But also, I did not know where to find certain materials here that I could use to make my sculpture. Luckily, I have a wonderful landlord who happened to work in a metal shop, creating greenhouses for the town of Pescia (famous for its flower production) and most of Tuscany. When I could not find a metal flange and fitting pipe, he said, "I will just make one!"
And so I found myself meeting some of the guys in the metal shop and watching my landlord's new puppy, Gregory da Pisa, get his first experience around welding. He was not a fan and when he was not barking his protest and fear, he was stealing gloves! For me, at least, it was a wonderful day!
Although I finally found a place to call home in Tuscany and I use several of the rooms for studio space, I do not have a space or doors large enough to create a garden-sized sculpture. Sure, I could get the armature parts in, but how would the sculpture get out? My front door enters into the kitchen and that was my studio for a couple of months. I ended up using the kitchen table because this black beaut you see here was bought from a friend and shortly after this image was taken, the guys moved the black table up into my main studio. Now, slowly to figure out the position of the parts in my design . . .

Loving animals really enhance life. I adore this little puppy, Gregory, and yet, when he feels that I am not giving him enough attention, he has no problem trying to eat what is taking me away from him! Here, I am sitting on my front steps, sewing metal wire around some metal fencing material I bought to support the weight of the clay AND the future mold of the elephant ears.
![Gregory da Pisa, dog as art assistant for wire sculpture armature [chewing on wires]](https://cdn.shopify.com/s/files/1/0401/6318/0693/files/web_f160513_L025_DogSittingGregoryMakingArmature4Sculpture.jpg?v=1594413684)
And the arranging is starting to happen. Note that at this point, I do not really need the original drawing. The work will start to take on a life of its own and will change in the developing.
I need to remember the desired size for this sculpture. Molten bronze shrinks a little as it cools, and I do consider all of the factors of which I am aware, but I measure and re-measure, marking the board. This also helps me understand the relationships and location of each part within the composition. The board will not be large enough to also support the mold, but it was the best that I had to work with. However, at the foundry, the mold-maker simply added level boards to each side before he began his work with the rubber and plaster.
In my sketch below, you may see the two circles drawn on the paper. I have drawn the bird's eye view of the sculpture composition so that I know exactly where to place the vertical section of the armature. I need to know where this is before I continue. The armature is the most important part, just as the foundation of the house is. There is little opportunity to change the pose once I secure the metal armature to the board.

Plastilina (a special non-drying sculptor's clay) is expensive, so I needed to find a material to create the shape of the larger and even the smaller stones that make up the base of the garden sculpture. Again, my neighbor helped out when he called and said he was on his way to the big hardware store and asked if I wanted to come along. Oh my, yes! I knew that I would find something there.. or if not, at least I would stop imagining that I would and could make a plan to get to Firenze for proper supplies.
However, I found an answer: spray insulation foam. It is used to caulk windows and doors: a protection from drafts. It would stick to my board, making for easier carving and mold-making. And it would be strong enough to support the other materials and the mold itself without collapsing the shapes.

Then I used my landlord's buckets of sandy gravel to create stone shapes. I dug down into the material, creating the basic shape of the rocks I wanted for the individual towers that would rest on top of the larger stone shapes in the base. This image was taken hours after the foam expanded to full size. Once I wiped off the sand, I was able to cut and shape these into the rocks I desired.
The puzzle is starting to come together.
I then melted and colored plain paraffin wax I bought from another hardware store near a bus station. The uncut surface of this foam is slick and I worried the clay may not stick and stay in place. The cut foam is porous and a bit messy. After cutting, there are lots of little static-filled pieces that want to cling to everything. Annoying! The wax not only seals the porous foam, but allows me to add a "tooth" to grip the plastilina. Also, this wax is cheaper than plastilina and I can fill holes and add bulk where I want it, minimizing my need for the plastilina.

Here you may see the progress as I have applied the pale green plastilina over much of the developing sculpture. The hanging frog is only a cut-out paper doll. I wanted his position marked so that I could arrange the stones, and therefore the other frog so that the sitting frog is looking up at the hanging one, wondering what will happen.
My little visitor came to help again? hmmmm...not sure that I could call him an assistant.
I poured some water over the clay sculpture to see if I was creating a little birdbath and also to test where the water would flow in the base part. This was fun, although without having a clay wall or other barrier around the sculpture, there was a limit to how much water I wanted to end up on my kitchen floor. 
Finally: 29 June 2016: I needed to photograph this sculpture and waited for the afternoon sun to enter the kitchen to try for some directional lighting. However, little Gregory was back and I was babysitting while my landlord had to be away for a while. I noticed that the boogie-dance music I was listening to on YouTube got Gregory feeling energetic, so I tried something new.
I found the traditional baby Lullabye by Brahms and played it. [Maybe you may see the picture of the sleeping [human] baby on my laptop in the picture?] It worked! Gregory nestled up in the chair and passed out!
I was then able to focus on moving the semi-delicate sculpture around to take the images to send the client for approval. Ah, music is often a saviour!
Rock Towers and Frogs Bronze Sculpture Pre-Casting Materials
The inspiration for this garden sculpture which is over a yard tall was another bronze sculpture I made some years before: Cattails and Frog Legs. More foliage was added, as well as the rock towers, to give the piece a more substantial feel as it was enlarged.
I decided to design shapes that may allow for a subtle fountain, especially since the first bronze casting of this composition will be going into the center of a small pond. So, the stones are larger at the base and should have enough interior space to store a pump. Although, depending on the height of the water level, one may prefer to build a base under this sculpture and that could be designed to hold the pump well beneath the surface of the water.
I envision the water coming up out of one of the rock towers and spilling down and into a bowl-like rock shape that may serve as a small bird bath as well. I tested this by pouring water over my clay composition and reshaping the stones as needed. However, as I write this on September 4, 2016, the wax has not yet been created from the mold. Without the armature, perhaps I can try the water test again. This will be fun. In any event, I like the composition, with or without it doubling as a fountain.
More images can be seen below. Note that the sculpture will be cast into separate pieces [even many of the rocks], so some of the images may not look so "picture perfect" as a finished sculpture in clay.
Rock Towers and Frogs at Bronze Casting Foundry Italy
So, a few of the locals stopped by and saw the finished sculpture in clay before my landlord Nori and I loaded up his van and headed to Pietrasanta, Italy. This is a famous town for stone carvers, but also for bronze sculpture. I think that Gregory was enjoying his first trip north of his birthplace, Pisa.

My sculpture gets unloaded with the help of the foundry staff and my landlord, Nori. One elephant ear fell to gravity's enticement during transport, but was easily repaired before mold-making. Part of the beauty of bronze is that one can design thin extended parts and the metal is strong enough to stay in position.

Here you see Gregory wishing he was not on a leash in the patina room at the foundry. The mold-making room was in the same building. Interesting that they put the beginning of the process with the last stage of the bronze-casting process in the same location. But, one makes use of the space one has!
For anyone curious, Italy is QUITE dog-friendly and you can bring a dog inside most anyplace in which he can behave. Sadly, the Italians are not so good about cleaning up doggie souvenirs, although I rarely see any inside!

Here I am putting on final touches after transporting the sculpture in plastilina (clay) to the foundry in Italy. Photo by Nori Matteucci, 1 July 2016.
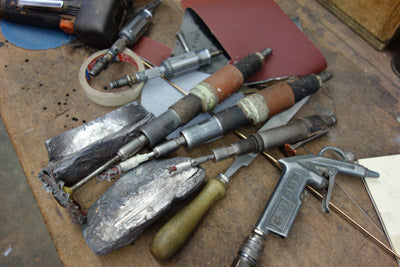
Below you see Raimondo chasing wax. "Chasing" is a term that means that he is cleaning up the wax duplicate of my sculpture after it is removed from the mold. Thus, he is removing mold lines and re-sculpting any details that might not have turned out well (air bubbles in the wax, for example).
Because this is the lost wax method of bronze casting, one considers the cooling rate of molten bronze. Thinner sections will cool faster than thicker sections. So, when a wax copy is made of my original sculpture, the goal is to make a HOLLOW copy (except where the design is thin, such as in my plant stems and leaves) that has more or less a consistent thickness. This minimizes the effect of shrinkage and avoids many problems for the finish bronze art.
October 12, 2016: I returned to the foundry to work with my waxes and proof what Raimondo had already completed before my arrival. When I lived in Texas, I did all of this work myself. Here, with my travel limitations and my bum leg, I decided to pay the foundrymen to help me.
I like the setup they have here, with many stations set up with fire, tables, and chairs. It is normal for artists to come and do much of the wax work themselves. Time is money, but also we tend to be particular about our work in a way that may be difficult for even professional wax workers to be able to anticipate.
Once the waxes are all prettied up, they go to Simone [pronounced See-moan-eh]. He attaches the sprues. The molten bronze will have to enter the sculpture in one place, fill the sculpture, and then chase air out the vents as it flows beyond the artwork. Spruing means to attach these wax feed- and vent-lines (collectively called 'sprues') to the art in the specific desired places. This will be different for every original composition, as well as for every foundry.
Also, they numbered each one of my elephant ear leaves with a large number in the wax. [I assume they gave the corresponding number to the stems as well.] However, at the sprue stage they showed me how they had filled-in this number and replaced it with a smaller wax "thumb tack" that had the same number on its head. That way, they only cut off a thin line of metal. The metal work will be much less now. In my experiences, anything that can be done in the wax should be. Metal does not move the same way that wax does and it is harder to get certain effects/textures in metal.

Now (below) you may see some of my wax parts. Do you see the hollow rocks? The cattails and the frogs were cast solid. However, they were cast separately since they are thicker overall from the forms (stems) to which they connect. Later they were welded into place.
Note that on hollow forms you will need an entrance hole and an exit. Later this sprued wax will be dipped many times into a ceramic shell slurry, building layers that will later be fired for a one-shot mold. During the firing, the wax will melt out (hence the name "the lost wax process") and all that is left is an air space for the bronze to fill. So, the slurry MUST enter and fill the hollow shapes or they would become one large form all over again when the wax is melted out, defeating the purpose. This second mold is a one-shot mold, not re-usable like the rubber and mother mold combination to create the wax version of the sculpture.

Oh, I love stuff like this! Knowing the qualities of your materials allows you to use them to solve problems during the process of making art. For example, here you see water being used to store (and cool) the wax replica of my original sculpture base (the large rocks).
Water does not mix with wax and it will not change the texture of the wax surface. Also, water is fluid . . . hhaha . . . meaning that it will move freely, filling in all the spaces around whatever shape the wax has while supporting it. And wax floats in water. All this makes for a great way to support otherwise fragile material in a constant variety of shapes, while also stabilizing its temperature. Too cold, the wax is hard to work, too warm and it will not retain the fine details and texture.
Note that the base has been reinforced with bamboo, another material, like wax, that can be burned out during the ceramic mold-making process. And it is strong and cheap. Perfect!
Later, when the oddly shaped ceramic mold needs to be supported upside down and vertical enough for the molten bronze to be poured into it and have it flow the way you designed the sprues to aid in that process, we use SAND to support the mold. Sand can also move and adapt to any form and allows the mold to be positioned even while hot. Also, if for some reason the ceramic slurry mold breaks or develops a leak, the sand can be quickly thrown over the leak and seal it.

Here you see the base has been removed from the water bath and flipped upright on the table for me to look it over and change anything I am not satisfied with. They do good work here! I do not think that I added anything more to Raimondo's work.
Raimondo is showing one of the men from the metal department the images I brought showing my original composition. They are consulting on whether the rock towers should be built in the wax or in the metal. Despite my idea of welding in wax, they opted to weld the stone together in the metal. The reasoning was that something may shift during fusion and we would have to start again at making new waxes. While I preferred the other way, there is the very real danger that if I drop one of the waxes while trying to balance them into a tower, we would again have to cast new waxes.
Also, I know well the foundry process having worked with many foundries in the US and doing my own casting back when I was at the Elisabet Ney Sculpture Conservatory (student and later teacher). But living in a foreign country teaches one to listen sometimes. People function and do good work having developed their own techniques or strengths. While we can share information and learn from one another, it is sometimes a delicate balancing act to know when to insist on your way or to defer to theirs. As I mentioned elsewhere before, I sometimes confer with the foundry before creating a design. If I make something they cannot reproduce, I lose. Also, they may have a better idea for how to produce my vision. In this case, they know their way of casting metal better than I do.
Here are a few images from the foundry:

This is an image of some of the original molds made for my sculpture Rock Towers and Frogs. There are fourteen pieces altogether. John Borsheim and I used to make my molds out of rubber and then used fiberglass for the mother (outer supporting) mold. It is much lighter and stronger.
These molds are made out of plaster and iron for reinforcement with metal handles added. They also surprised me by putting several components into one mold! So, it was clear that I would not be able to carry any of these on the bus or train or by foot with me. So, they stayed there until I could find a solution.. or hopefully can sell another bronze of this composition. [In the end, I treated my neighbor to a beautiful lunch in Viareggio and he drove his car to the foundry in Pietrasanta. The mold is now safely stored in my home. One thing that I abhor is how some foundries leave their clients molds lying about either outside or with access to rain, sun, or thieves. I pay good money for molds and need to protect them!]
Thank you for reading this far and please share with your friends if you enjoyed this. Also, if interested in acquiring any of my artwork, please contact me!
